- What students need to know about measurement in fourth and fifth grades
- How you introduce measurement to students
- Student misconceptions about measurement
- How to differentiate instruction for converting customary and metric measurements
- Measurement activities examples
[0:14] What do students need to know about measurement in fourth and fifth grades?
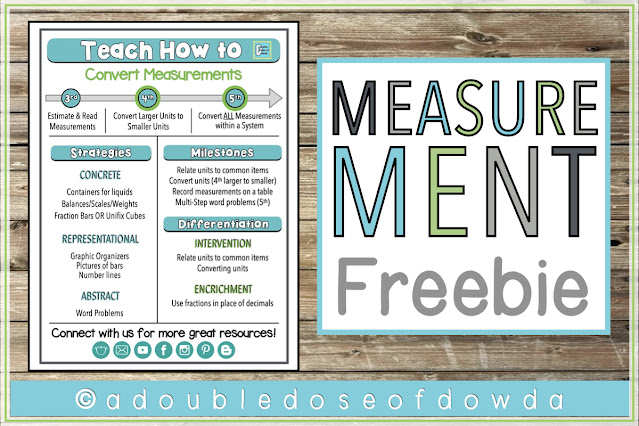
Let’s review the progression of standards. In third grade, students begin by learning the different units of measurement. They learn how to estimate measurements and how to read measurements on a scale.In fourth grade, students are expected to begin converting measurements. They start by converting from larger to smaller units. In fifth grade, students are expected to convert all units of measurement within the same system.
[0:41] How you introduce measurement to students
The best approach to teaching measurement conversions is to use the CRA model. This model is based on the idea that we start with concrete activities, where students use hands-on and manipulative approaches to math. Then we move to representational activities, where students rely on pictures and drawings as visual representations of the math concepts. Finally, we move to abstract activities, where students are using equations and algebra for measurement conversions.When we talk about concrete activities, we can have students use liquid containers, balances, scales, weights - anything that allows them to touch and sense what they are actually doing when they are converting measurements. They need to see it on a scale first before they can visually represent it. We can use fraction bars or unifix cubes to keep things concrete.
Moving to representational activities, we can bring in graphic organizers, pictures of bars, and number lines. We are going to dive into these activities in more detail below.
When we get to abstract activities, we can focus on algorithms that students can use as well as solving word problems.
[1:55] Concrete instruction for measurement conversions
Let’s start with making customary conversions concrete for students. I’ll begin with blank tables for customary length, weight capacity, and time. Students can help list the measurements from smallest to largest.- INCH
- FOOT
- YARD
- MILE
1 ft = 12 in
2 ft = 24 in
3 ft = 36 in
4 ft = 48 in
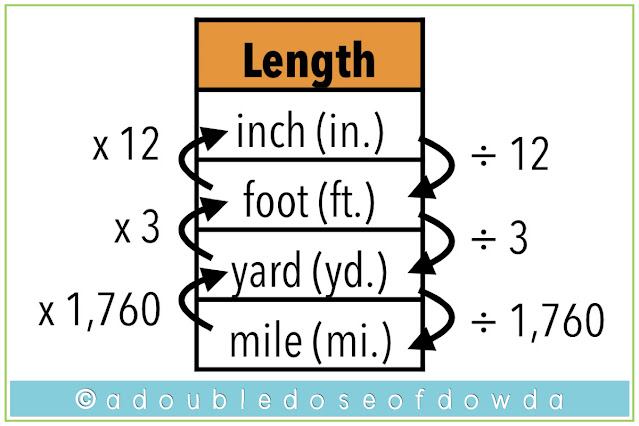
The next thing I would ask students to do is to begin noticing patterns. I anticipate they will begin to notice that they are increasing by one as they go down the left side of the table (1, 2, 3, 4) and on the right side they are multiplying by 12 (1x12, 2x12, 3x12, 4x12). I want them to record that once they have established those patterns. Anytime we are converting from feet to inches, we will multiply the number of feet by 12. We will notate that on the original table as well. I like to have the students draw an arrow between foot and inch, and write in that they will multiply by 12.
For fourth graders, the standard is only for them to move up this chart and convert measurements from a larger unit to a smaller unit. All they will be doing, therefore, is multiplying. Fifth graders, however, need to be able to convert from smaller to larger as well. We want them to see the pattern is that they are dividing by 12 when they are converting from inches to feet. So, we record that on their tables as well.
I then repeat this process for whatever tools I have available in my classroom. If you have yardsticks, for instance, you can have the students go through the same process and determine how many feet are in one yard, two yards, three yards, and so on. They can record this in their charts just like they did before, allowing them to discover that when they move from yards to feet they are multiplying by three. Again, for fifth grade, they have to move from feet to yards as well.
If you do not have a lot of measurement tools on hand, a creative solution for exploration would be to use fraction bars or unifix cubes. Sometimes unifix cubes are also called connecting cubes, and you might have easier access to those or you could borrow them from a lower grade level.
With the fraction bars, we can establish that a larger unit is one whole and the smaller unit is going to be a fraction tile. For instance, if we are talking about feet and inches, then the whole is going to represent the foot and it takes 12 inches to make one whole foot. We can then use twelfths to represent the inches. The students can then physically count the twelfths, and figure out how many feet there are.
With the connecting cubes, you can establish that 12 units equals one foot. It probably won’t actually measure one foot in length, but it represents how many inches it takes to create one whole foot. Three cubes (as feet) could equal one yard.
Note that, whenever we use the unifix cubes or fraction bars, they are best just for an introduction and they are only good for moving across one unit of measurement.
Next, we can move on to talking about multiple units of measurement. The next thing that I would have students do with the rulers, yardsticks, and whatever tools we have available, is I would ask them to consider how many inches are in a foot and how many feet are in a yard. By putting the measurement tools together, I would want them to discover that there are 36 inches in one yard. A lot of students may come in already recognizing that or picking it up very quickly. The challenge is that I want them to refer back to their charts and have them show 36 with what they already have. I want them to see that when we multiply something times three, and then again, times 12, we are also multiplying the original number by 36.
So, whenever we are using this chart and we need to convert across more than one unit, we can multiply the numbers together to tell us what we need to do. You can continue doing tables just like this with measuring cups for capacity, clocks for time balances, and scales for weight. There are some measurements that you will just have to tell students: how many feet are in a mile or how many pounds are in a ton, for example. You likely won’t have the resources for them to discover that on their own.
One quick tip I want to share for capacity involves what I call the Gallons Chart. Honestly, I myself never remembered measurement conversions for capacity until I started using this chart to teach my students.
In the chart above, you can see the gallon is represented with the big G. There are four quarts in a gallon, two pints in a court, and two cups in a pint. This is an incredibly visual way for students to remember capacity because some of those numbers can be a little bit funny. I still think of this chart whenever I have to solve something for capacity in my own life. If you are interested in getting this chart for interactive notebooks as a full page printout or even as a poster for your classroom, I have those listed here.
By the end of completing these tables, your students will have tables that look something like this:
As a reminder, fourth graders do not need the division piece on these tables. Fifth graders do. Students can keep their originals, but sometimes they aren’t set up in a way to be an easy reference later on. So I usually go head and give them a clean copy to put in their notebooks, and I also print it as a poster and hang it on the wall so they have a tool for reference.
[10:54] Representational instruction for measurement conversions
This anchor chart is essential as we move into the representational phase of the CRA model. With a little practice, most students can easily use this as a reference to complete problems and tables.For instance, if given a question about converting pounds to ounces or ounces to pounds, they should be able to use this table and see what they will be multiplying or dividing by. With multiplication, I want to point out a differentiation opportunity. Some students might prefer to draw out pictures. Let’s say we’re asking students to find how many feet are in three yards. We can draw out boxes similar to the fraction bars I referenced earlier. They can break the bars into yards and see visually that nine feet equal three yards. It can be a great way to represent problems if they aren’t quite independent with the conversion chart yet.
[14:00] Abstract instruction for measurement conversions
Lastly, let’s talk about how students can solve customary conversion problems abstractly. We are going to set them up to create equivalent fractions. For instance, if we say five pints equals how many cups, we can set that up as an equivalent fraction. We know two cups are in one pint, and we want to know how many cups are in five pints. We have to make sure students understand that we keep the cups as the numerator and the pints as the denominator. If they are solving problems like this, it doesn’t matter which they choose for the numerator versus the denominator, but the units have to be consistent.If students are really good at equivalent fractions, this will be a great model for them to follow. They can set it up as 2 cups/1 pint = X cups/5 pints. To get from 1 to 5, they have to multiply by 5. 2x5=10, so we can see that 5 pints equals 10 cups. This equivalent fraction model is abstract and it doesn’t rely on the visual representations of the charts. It’s a great option, especially for advanced students who want to save time.
[16:12] How to teach metric conversions for fourth and fifth grades
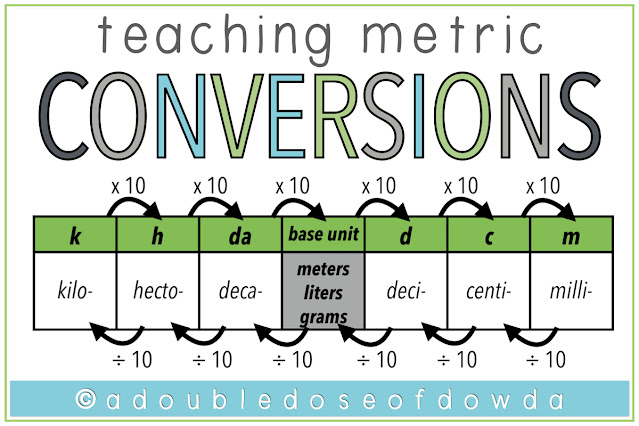
So far we have only discussed customary conversions, so I wanted to talk about metric conversions as well. You can have students go through a similar process, where they can use measurement tools to figure out the conversion. Instead of using tables like we created for customary units, however, I like to use a model that looks a bit different.I teach students a silly phrase to remember the prefixes for metric conversions. There are a lot of different options, but I use “Kangaroos Have Dandruff But Don’t Care Much”.
K H D b D C M
With metric, the same prefixes of course work for meters, liters, and grams. I always underline b because that is the base unit (meters, liters, or grams). At least in the beginning, I like to have students write those things out. Then I will remind students that if we have a number, for instance the number 10, then placing a decimal point at the end does not change the value. In addition, they need to understand that I can put as many zeros after a decimal as I would like and it still doesn’t change the value. I can also put as many zeros in front of my whole number without changing the value.
Just like before, sometimes I will have students draw arrows showing that as we move to the right we are multiplying by 10. As we move to the left, we are dividing by 10. After I have students try some of these conversions out, I teach them the decimal shortcut.
Let’s say I have 10 meters and I want to know how many centimeters there are. I tell students that we need to see how many jumps and in what direction we need to move on our chart for meters to centimeters. Meters is our base unit, so the decimal would be after the 10. I move two spaces to the right to get to centimeters on my chart, so the new decimal would be here: 1000 centimeters = 1 meter. I probably wouldn’t start with the number 10 for them, because that extra zero can be a little tricky. I would probably start with a single-digit number for students.
[20:12] Student misconceptions about measurement
Once they learn the decimal trick, the problem is that they tend to get especially confused when we move the decimal to the left and the answer is less than one whole. For instance, if we were asking 10 meters = X kilometers, we would move the decimal to the left 3 spots. I will often have them place their decimal before they start their jumps, because otherwise they will go too far. They will get confused and want to put the decimal in front of the K instead of after. So we place the decimal and then count the jumps as 1, 2, 3. The answer, in this case, would be 10m=0.01km.That is a good opportunity to have a conversation with students about how we could add zeros after the decimal without changing value. 0.01km=0.010km. I also want students to get into the habit of putting a zero in front of the decimal point. The decimal moving strategy is the most time-saving and efficient way to solve metric conversions.
[22:37] Milestones for measurement conversions in fourth and fifth grades
Milestones, or what we want to make sure students can do when they are converting measurements, look pretty much the same for fourth and fifth grades. First, they need to be able to relate units to common items that they are familiar with. If they don’t have a sense of the items and what size things are, they are going to struggle with doing the measurements and the conversions.Next, they need to be able to convert measurements. Again, fourth grade only needs to be able to move from larger units to smaller units. They need to be able to record measurements on a table.
Lastly, especially in fifth grade, we need them to be able to do multi-step word problems using more than one operation.
[23:28] How to differentiate instruction for converting customary and metric measurements
If you find your students are having trouble with any of the activities I have described, they may need to review relating unit sizes to common items. Converting units is what most students are going to struggle with, so it’s really helpful for them to have reminders and little tools they can use to reference what they need to multiply or divide by to get to the next unit. Keeping those handy is going to be a great intervention for students who are struggling. Making sure they know how to read and use that chart is critical.Instead of giving students a whole chart, you might want to focus on one particular part of it. Some students may never move to the algorithm piece that I talked about. They may just live in the representational phase where they rely on the chart quite often. Most students will be able to answer grade-level questions by doing that.
If you have students who need a little bit of a challenge, it is not uncommon in converting measurements for us to use decimals (especially with the metric system). Perhaps you can also throw in some fractions for enrichment. They will have to convert fractions to decimals in order to convert their measurements, so that is a great area for them to practice.
[25:07] Measurement activities examples
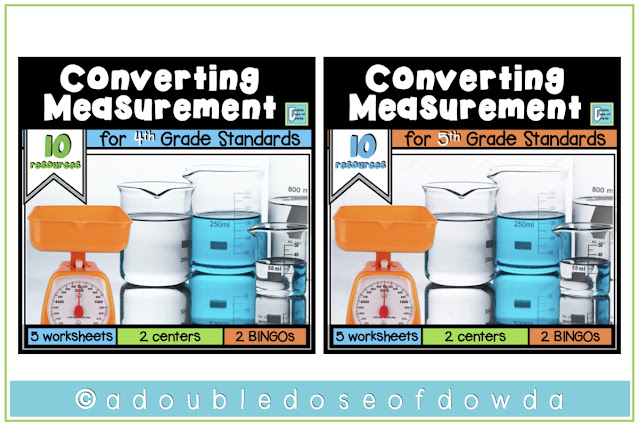
I put together a couple of different activity packs that will work for you whether you teach fourth or fifth grade.I have a fourth grade pack that only includes converting measurements from larger units to smaller units.
I have a fifth grade pack where they convert larger to smaller units and smaller to larger units.
Each of these has the same content just differentiated for grade level. For each, there are five worksheet mazes. There is one maze about customary length, one about customary weight, one about customary capacity, one about customary time, and one that focuses on metric. There are five mazes in each bundle.
There is also an anchor chart for each bundle, showcasing the customary conversions and the metric conversions.
For each bundle, there are two tic-tac-toe games: one is metric and one is customary units.
Then, there are two task cards in each of these units - again, one customary and one metric.
Lastly, each bundle has two BINGO games: one customary and one metric.
If you are interested in those bundles, you can find them here:
- Customary and Metric Measurement Conversions Bundle for 4th Grade
- Customary and Metric Measurement Conversions Bundle for 5th Grade
I also have a FREE handout for you. It includes everything I shared here as far as the progression of the standards, the different strategies and techniques you can use for the CRA model, a list of the milestones, and ideas about differentiation and where to focus for intervention or enrichment. I like to have those printed and in with my lesson plan books.
Get the free handout here.
I hope this post was helpful in informing your instruction - thanks for reading!


No comments
Post a Comment